

哪吒面板宝塔搭建教程(反代 8008 + WebSocket + gRPC)
这篇教程适合用宝塔面板部署 哪吒监控 Dashboard,然后通过域名反向代理访问。
按你这套方式搭,核心就几步:
- 先用脚本安装哪吒面板
- 确认 Dashboard 跑在
8008端口 - 宝塔创建站点并反代
8008 - 在 Nginx 配置里补上
upstream、gRPC、WebSocket
我核对了哪吒官方文档,
2026-05-11这天官方文档里仍然说明:V1 之后 Dashboard 和 gRPC 默认共用8008端口。
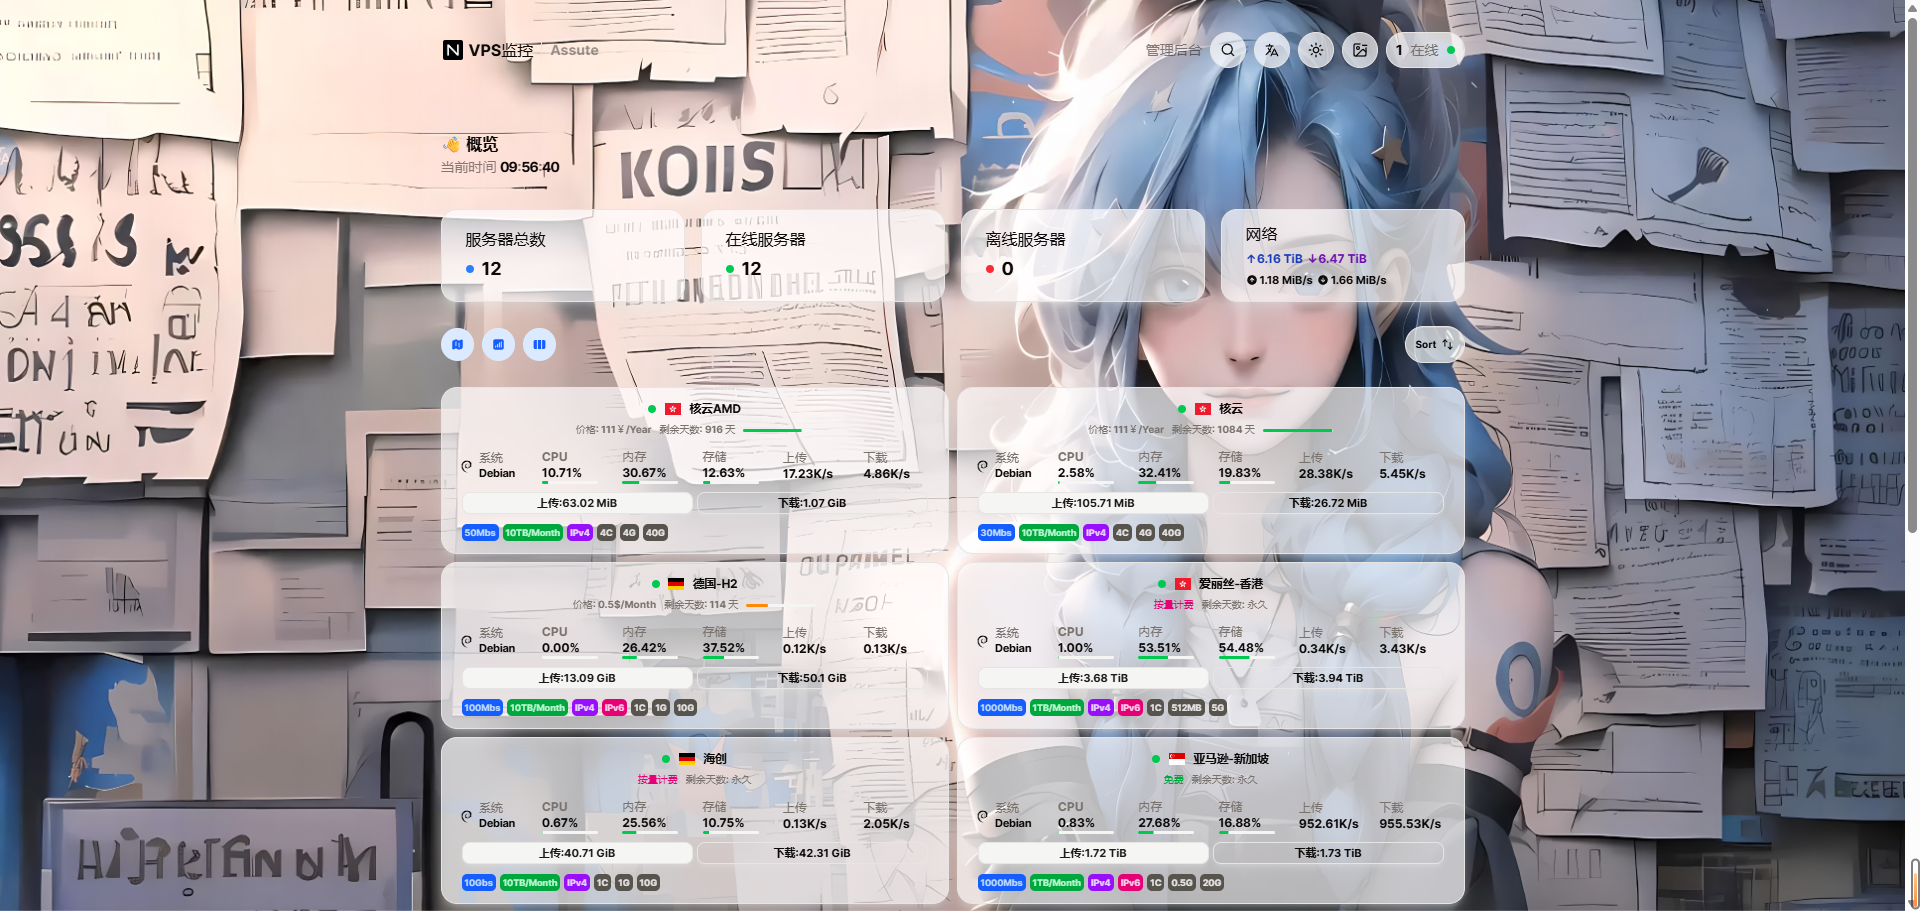
效果图:
一、先安装哪吒面板
先用 SSH 登录你的服务器,直接执行安装命令:
curl -L https://raw.githubusercontent.com/naiba/nezha/master/script/install.sh -o nezha.sh && chmod +x nezha.sh && ./nezha.sh执行后根据脚本提示完成安装即可。
如果安装成功,哪吒 Dashboard 默认会监听:
127.0.0.1:8008也就是说,后面宝塔反代时,目标地址就是这个端口。
二、宝塔添加网站
安装完后,先在宝塔里新建一个网站,绑定你准备给哪吒面板使用的域名。
创建完站点后,进入站点设置,后面我们会改它的 Nginx 配置。
三、在站点配置里添加 upstream
打开宝塔站点配置文件,在合适位置先加入:
upstream dashboard { keepalive 512; server 127.0.0.1:8008;}参考图:
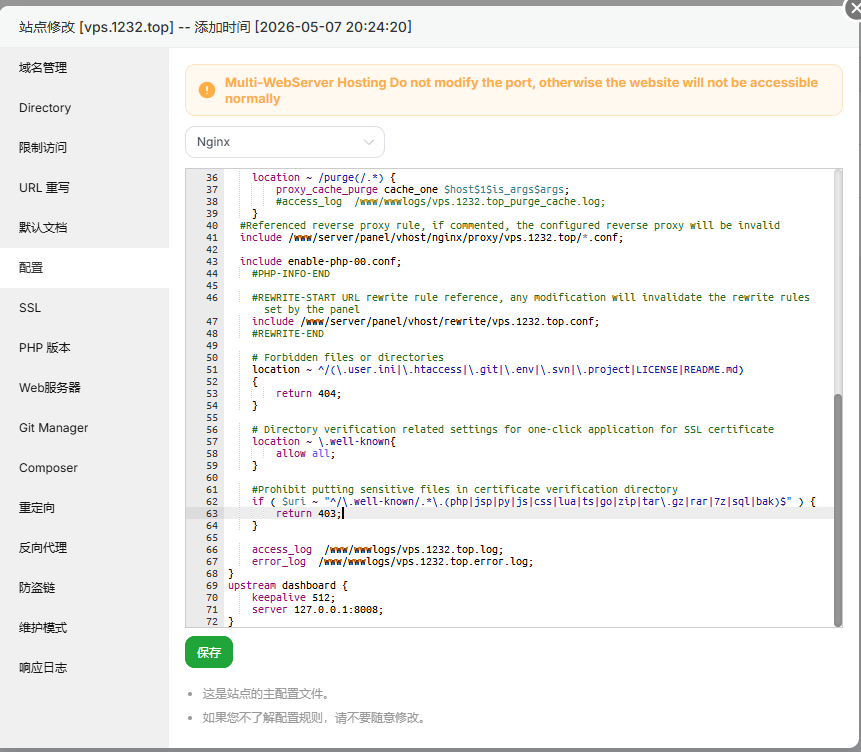
这一段的作用,是给后面的 grpc_pass grpc://dashboard; 提供上游目标。
四、宝塔反代 8008 端口
接着在宝塔站点里创建反向代理,目标填:
http://127.0.0.1:8008先把基础反代建好,然后再手动修改配置文件。
因为哪吒面板不只是普通网页,它还会用到:
gRPCWebSocket
所以如果只点宝塔默认反代而不补配置,后面常见问题就是:
- Agent 连不上
- WebSocket 终端打不开
- 文件管理或在线终端异常
五、修改宝塔站点反代配置
把反代配置改成下面这样:
#PROXY-START/location ^~ / { proxy_pass http://127.0.0.1:8008; # 改成自己的端口 proxy_set_header Host $host; proxy_set_header X-Real-IP $remote_addr; proxy_set_header X-Forwarded-For $proxy_add_x_forwarded_for; proxy_set_header REMOTE-HOST $remote_addr; proxy_set_header Upgrade $http_upgrade; proxy_set_header nz-realip $remote_addr; proxy_set_header Connection "upgrade"; proxy_set_header X-Forwarded-Proto $scheme; proxy_http_version 1.1; proxy_read_timeout 3600s; proxy_send_timeout 3600s; proxy_buffer_size 128k; proxy_buffers 4 128k; proxy_busy_buffers_size 256k; proxy_max_temp_file_size 0; add_header X-Cache $upstream_cache_status; add_header Cache-Control no-cache; proxy_ssl_server_name off; proxy_ssl_name $proxy_host; add_header Strict-Transport-Security "max-age=31536000";}
underscores_in_headers on;set_real_ip_from 0.0.0.0/0; # CDN 回源 IP 地址段
# gRPC 服务location ^~ /proto.NezhaService/ { grpc_set_header Host $host; grpc_set_header nz-realip $remote_addr; grpc_read_timeout 600s; grpc_send_timeout 600s; grpc_socket_keepalive on; client_max_body_size 10m; grpc_buffer_size 4m; grpc_pass grpc://dashboard;}
# WebSocket 服务location ~* ^/api/v1/ws/(server|terminal|file)(.*)$ { proxy_set_header Host $host; proxy_set_header nz-realip $remote_addr; proxy_set_header Origin https://$host; proxy_set_header Upgrade $http_upgrade; proxy_set_header Connection "upgrade"; proxy_read_timeout 3600s; proxy_send_timeout 3600s; proxy_pass http://127.0.0.1:8008; # 改成自己的端口}#PROXY-END/参考图:
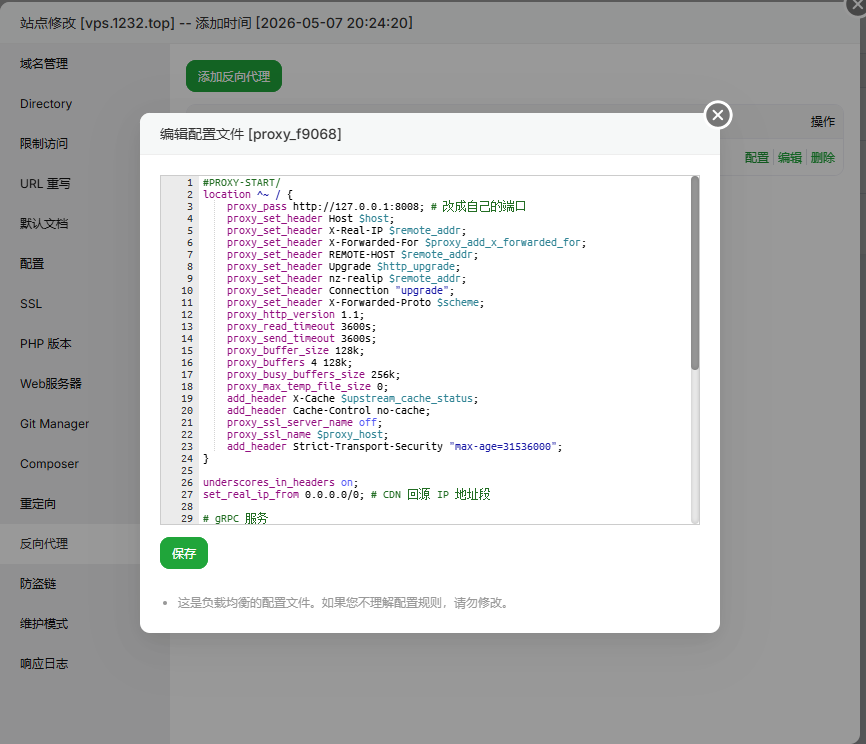
如果你前面不是用 8008,那这里所有的 127.0.0.1:8008 都改成你自己的实际端口。
六、登录哪吒 Dashboard
按官方文档当前说明,安装完成后的默认后台地址一般是:
https://你的域名/dashboard首次默认账号密码是:
admin / admin登录后建议第一时间修改密码。
七、添加自定义美化代码
登录后台后,进入设置,把下面这段代码粘贴到:
- 自定义代码(样式和脚本)
参考图:
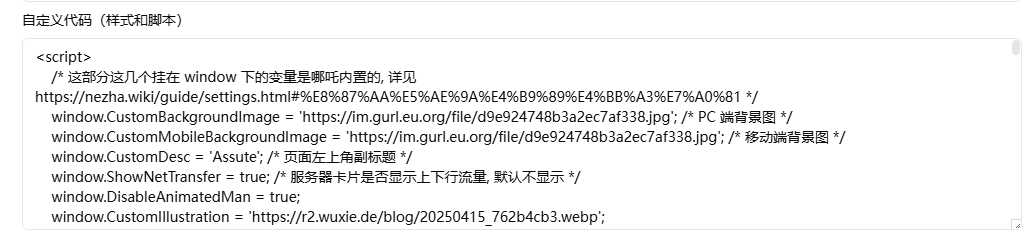
代码如下:
<script> /* 这部分这几个挂在 window 下的变量是哪吒内置的, 详见 https://nezha.wiki/guide/settings.html#%E8%87%AA%E5%AE%9A%E4%B9%89%E4%BB%A3%E7%A0%81 */ window.CustomBackgroundImage = 'https://im.gurl.eu.org/file/d9e924748b3a2ec7af338.jpg'; /* PC 端背景图 */ window.CustomMobileBackgroundImage = 'https://im.gurl.eu.org/file/d9e924748b3a2ec7af338.jpg'; /* 移动端背景图 */ window.CustomDesc = 'Assute'; /* 页面左上角副标题 */ window.ShowNetTransfer = true; /* 服务器卡片是否显示上下行流量, 默认不显示 */ window.DisableAnimatedMan = true; window.CustomIllustration = 'https://r2.wuxie.de/blog/20250415_762b4cb3.webp'; window.FixedTopServerName = true; /* 是否固定顶部显示服务器名称, 默认不固定 */ /* window.CustomLinks = '[{\"link\":\"https://xiny.cc/\",\"name\":\"首页\"},{\"link\":\"https://blog.xiny.cc/\",\"name\":\"博客\"}]'; *//* 自定义导航栏链接 */
/* 自定义字体, 注意需要同步修改下方 CSS 中的 font-family */ var link = document.createElement('link'); link.rel = 'stylesheet'; link.href = 'https://font.sec.miui.com/font/css?family=MiSans:400,700:MiSans'; // MiSans // link.href = 'https://npm.elemecdn.com/lxgw-wenkai-screen-webfont@1.7.0/style.css'; // 霞鹜文楷, font-family: 'LXGW WenKai Screen' document.head.appendChild(link);</script><script>window.FixedTopServerName = true; /* 是否固定顶部显示服务器名称, 默认不固定 */setInterval(function() { function formatFileSize(bytes) { if (bytes === 0) return { value: '0', unit: 'B' };
const units = ['B', 'KB', 'MB', 'GB', 'TB', 'PB']; let unitIndex = 0; let size = bytes;
while (size >= 1024 && unitIndex < units.length - 1) { size /= 1024; unitIndex++; }
let decimalPlaces = 1; if (unitIndex === 0) decimalPlaces = 0;
return { value: size.toFixed(decimalPlaces), unit: units[unitIndex] }; }
function calculatePercentage(used, total) { if (typeof used === 'string') used = Number(used); if (typeof total === 'string') total = Number(total);
if (used > 1e15 || total > 1e15) { used = used / 1e10; total = total / 1e10; }
return (used / total * 100).toFixed(1); } fetch('/api/v1/service') .then(response => response.json()) .then(data => { if (data.success) { const trafficData = data.data.cycle_transfer_stats;
const serverMap = new Map();
for (const cycleId in trafficData) { const cycle = trafficData[cycleId]; if (cycle.server_name && cycle.transfer) { for (const serverId in cycle.server_name) { const serverName = cycle.server_name[serverId]; const transfer = cycle.transfer[serverId]; const max = cycle.max;
if (serverName && transfer !== undefined && max) { serverMap.set(serverName, { id: serverId, transfer: transfer, max: max, name: cycle.name }); } } } }
serverMap.forEach((serverData, serverName) => { const targetElement = Array.from(document.querySelectorAll('section.grid.items-center.gap-2')).find(el => el.textContent.trim().includes(serverName));
if (targetElement) {
const usedFormatted = formatFileSize(serverData.transfer); const totalFormatted = formatFileSize(serverData.max);
const percentage = calculatePercentage(serverData.transfer, serverData.max);
const uniqueClassName = 'traffic-stats-for-server-' + serverData.id;
const insertedElement = targetElement.parentNode.querySelector('.' + uniqueClassName);
if (insertedElement) { const usedSpan = insertedElement.querySelector('.used-traffic'); const usedUnitSpan = insertedElement.querySelector('.used-unit'); const totalSpan = insertedElement.querySelector('.total-traffic'); const totalUnitSpan = insertedElement.querySelector('.total-unit'); const percentageSpan = insertedElement.querySelector('.percentage-value'); const progressBar = insertedElement.querySelector('.progress-bar');
if (usedSpan) usedSpan.textContent = usedFormatted.value; if (usedUnitSpan) usedUnitSpan.textContent = usedFormatted.unit; if (totalSpan) totalSpan.textContent = totalFormatted.value; if (totalUnitSpan) totalUnitSpan.textContent = totalFormatted.unit; if (percentageSpan) percentageSpan.textContent = percentage + '%'; if (progressBar) progressBar.style.width = percentage + '%';
return; }
let currentElement = targetElement; for (let i = 0; i < 2; i++) { currentElement = currentElement.nextElementSibling; if (!currentElement) { currentElement = targetElement; currentElement = currentElement.nextElementSibling; } }
const newElement = document.createElement('div'); newElement.classList.add('space-y-1.5', 'new-inserted-element', uniqueClassName); newElement.style.width = '100%';
newElement.innerHTML = ` <div class="flex items-center justify-between"> <div class="flex items-baseline gap-1"> <span class="text-sm font-medium text-neutral-800 dark:text-neutral-200 used-traffic">${usedFormatted.value}</span> <span class="text-sm font-medium text-neutral-800 dark:text-neutral-200 used-unit">${usedFormatted.unit}</span> <span class="text-xs text-neutral-500 dark:text-neutral-400">/ </span> <span class="text-xs text-neutral-500 dark:text-neutral-400 total-traffic">${totalFormatted.value}</span> <span class="text-xs text-neutral-500 dark:text-neutral-400 total-unit">${totalFormatted.unit}</span> </div> <span class="text-xs font-medium text-neutral-600 dark:text-neutral-300 percentage-value">${percentage}%</span> </div> <div class="relative h-1.5"> <div class="absolute inset-0 bg-neutral-100 dark:bg-neutral-800 rounded-full"></div> <div class="absolute inset-0 bg-emerald-500 rounded-full transition-all duration-300 progress-bar" style="width: ${percentage}%;"></div> </div> `;
currentElement.insertAdjacentElement('afterend', newElement); } else { console.log(`没有找到服务器 ${serverName}(ID: ${serverData.id}) 的元素`); } }); } else { console.log('API请求成功但返回数据不正确'); } }) .catch(error => { console.error('获取流量数据失败:', error); });}, 3000);</script><script>/* window.TrafficScriptConfig = { showTrafficStats: true, // 显示流量统计, 默认开启 insertAfter: true, // 如果开启总流量卡片, 是否放置在总流量卡片后面, 默认为true interval: 60000, // 60秒刷新缓存, 单位毫秒, 默认60秒 toggleInterval: 5000, // 4秒切换流量进度条右上角内容, 0秒不切换, 单位毫秒, 默认5秒 duration: 500, // 缓出缓进切换时间, 单位毫秒, 默认500毫秒 enableLog: false // 开启日志, 默认关闭 };*/</script><script src="https://cdn.jsdelivr.net/gh/8730062/installnet@main/jdt.js"></script>保存后,面板前台就会按这段脚本显示背景图、插画、副标题和流量进度条。
八、添加流量警报规则
如果前面已经加了自定义代码,前台就能显示流量使用进度。
如果还想在流量接近上限时收到通知,可以继续添加流量警报规则。
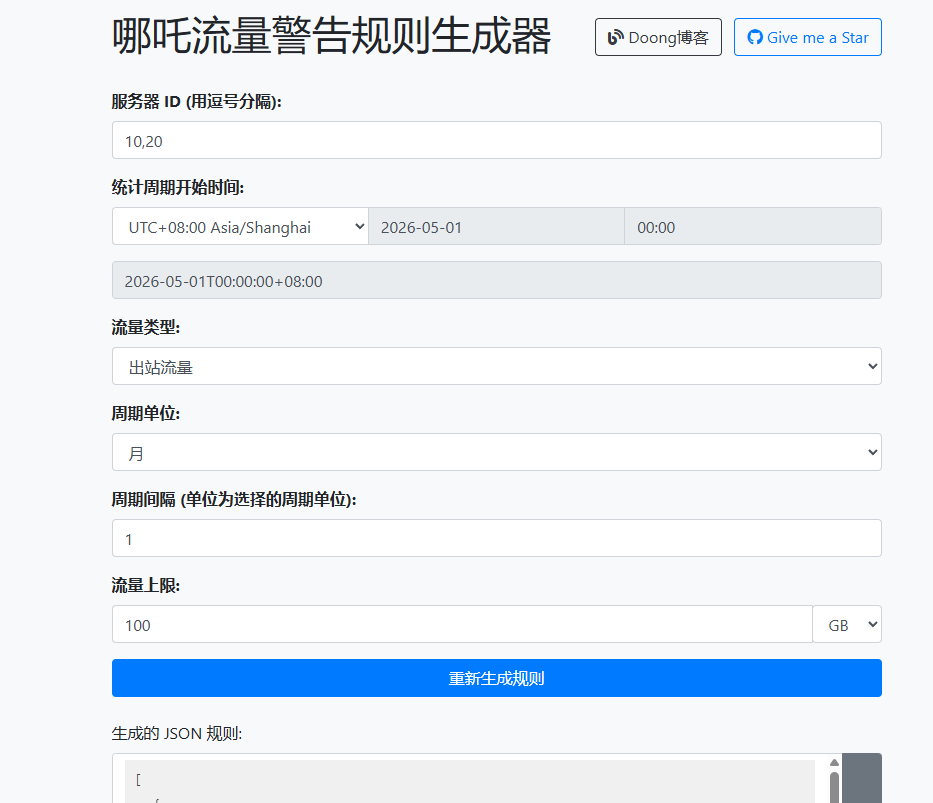
先打开规则生成器:
https://wiziscool.github.io/Nezha-Traffic-Alarm-Generator/
在页面里按自己的周期和流量阈值生成规则即可。
参考图:
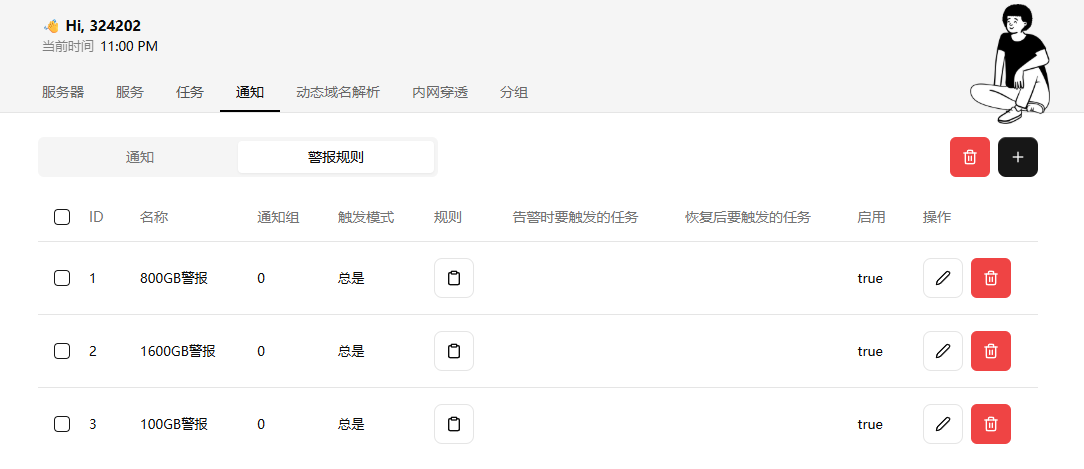
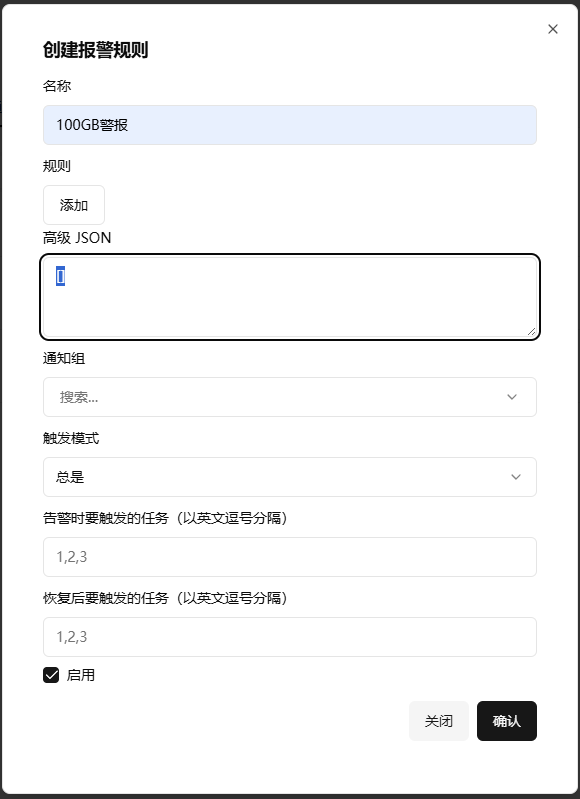
生成完成后,复制规则内容,回到哪吒后台:
- 打开
通知 - 进入
警告规则 - 添加刚刚生成的流量警报规则
- 保存后启用
参考图:
效果图:
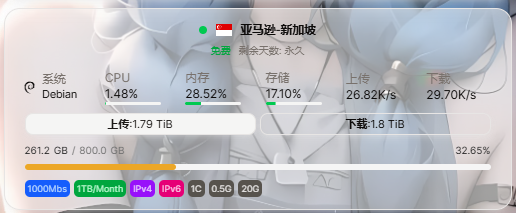
这样前台既能显示流量使用进度,流量达到设定阈值时也会按通知方式推送提醒。
九、在服务里添加 Ping 节点
如果你想让面板显示广东三网的 Ping,可以在服务里添加这几个地址:
- 广东联通:
gd-cu-v4.ip.zstaticcdn.com:80 - 广东移动:
gd-cm-v4.ip.zstaticcdn.com:80 - 广东电信:
gd-ct-v4.ip.zstaticcdn.com:80
添加后,前台就能看到这几个节点的探测结果。
十、如果前面套了 CDN
如果你的域名前面还接了 CDN,那真实 IP 头不一定还是 $remote_addr。
这时候通常要把:
set_real_ip_from 0.0.0.0/0;和真实 IP 头按你的 CDN 去改。
例如 Cloudflare 常见写法会用到:
real_ip_header CF-Connecting-IP;如果你现在是 Nginx 直接对外,没有再套 CDN,那按你现在这版配置先跑就可以。
十一、完成
到这里,宝塔搭建哪吒面板就完成了。
文章分享
如果这篇文章对你有帮助,欢迎分享给更多人!